 SQL Queries
This is where you can build and refine your queries. Queries can then be used on their own or within reports. See Reports for more information.

SQL Query Editor screen
How does it work?
Jira Cloud itself doesn't offer direct SQL access to its data; it uses Jira Query Language (JQL) for accessing work items. Any analysis, generation of charts, reports etc. requires exporting them or using dedicated apps. This application bridges that gap.
Here's the process:
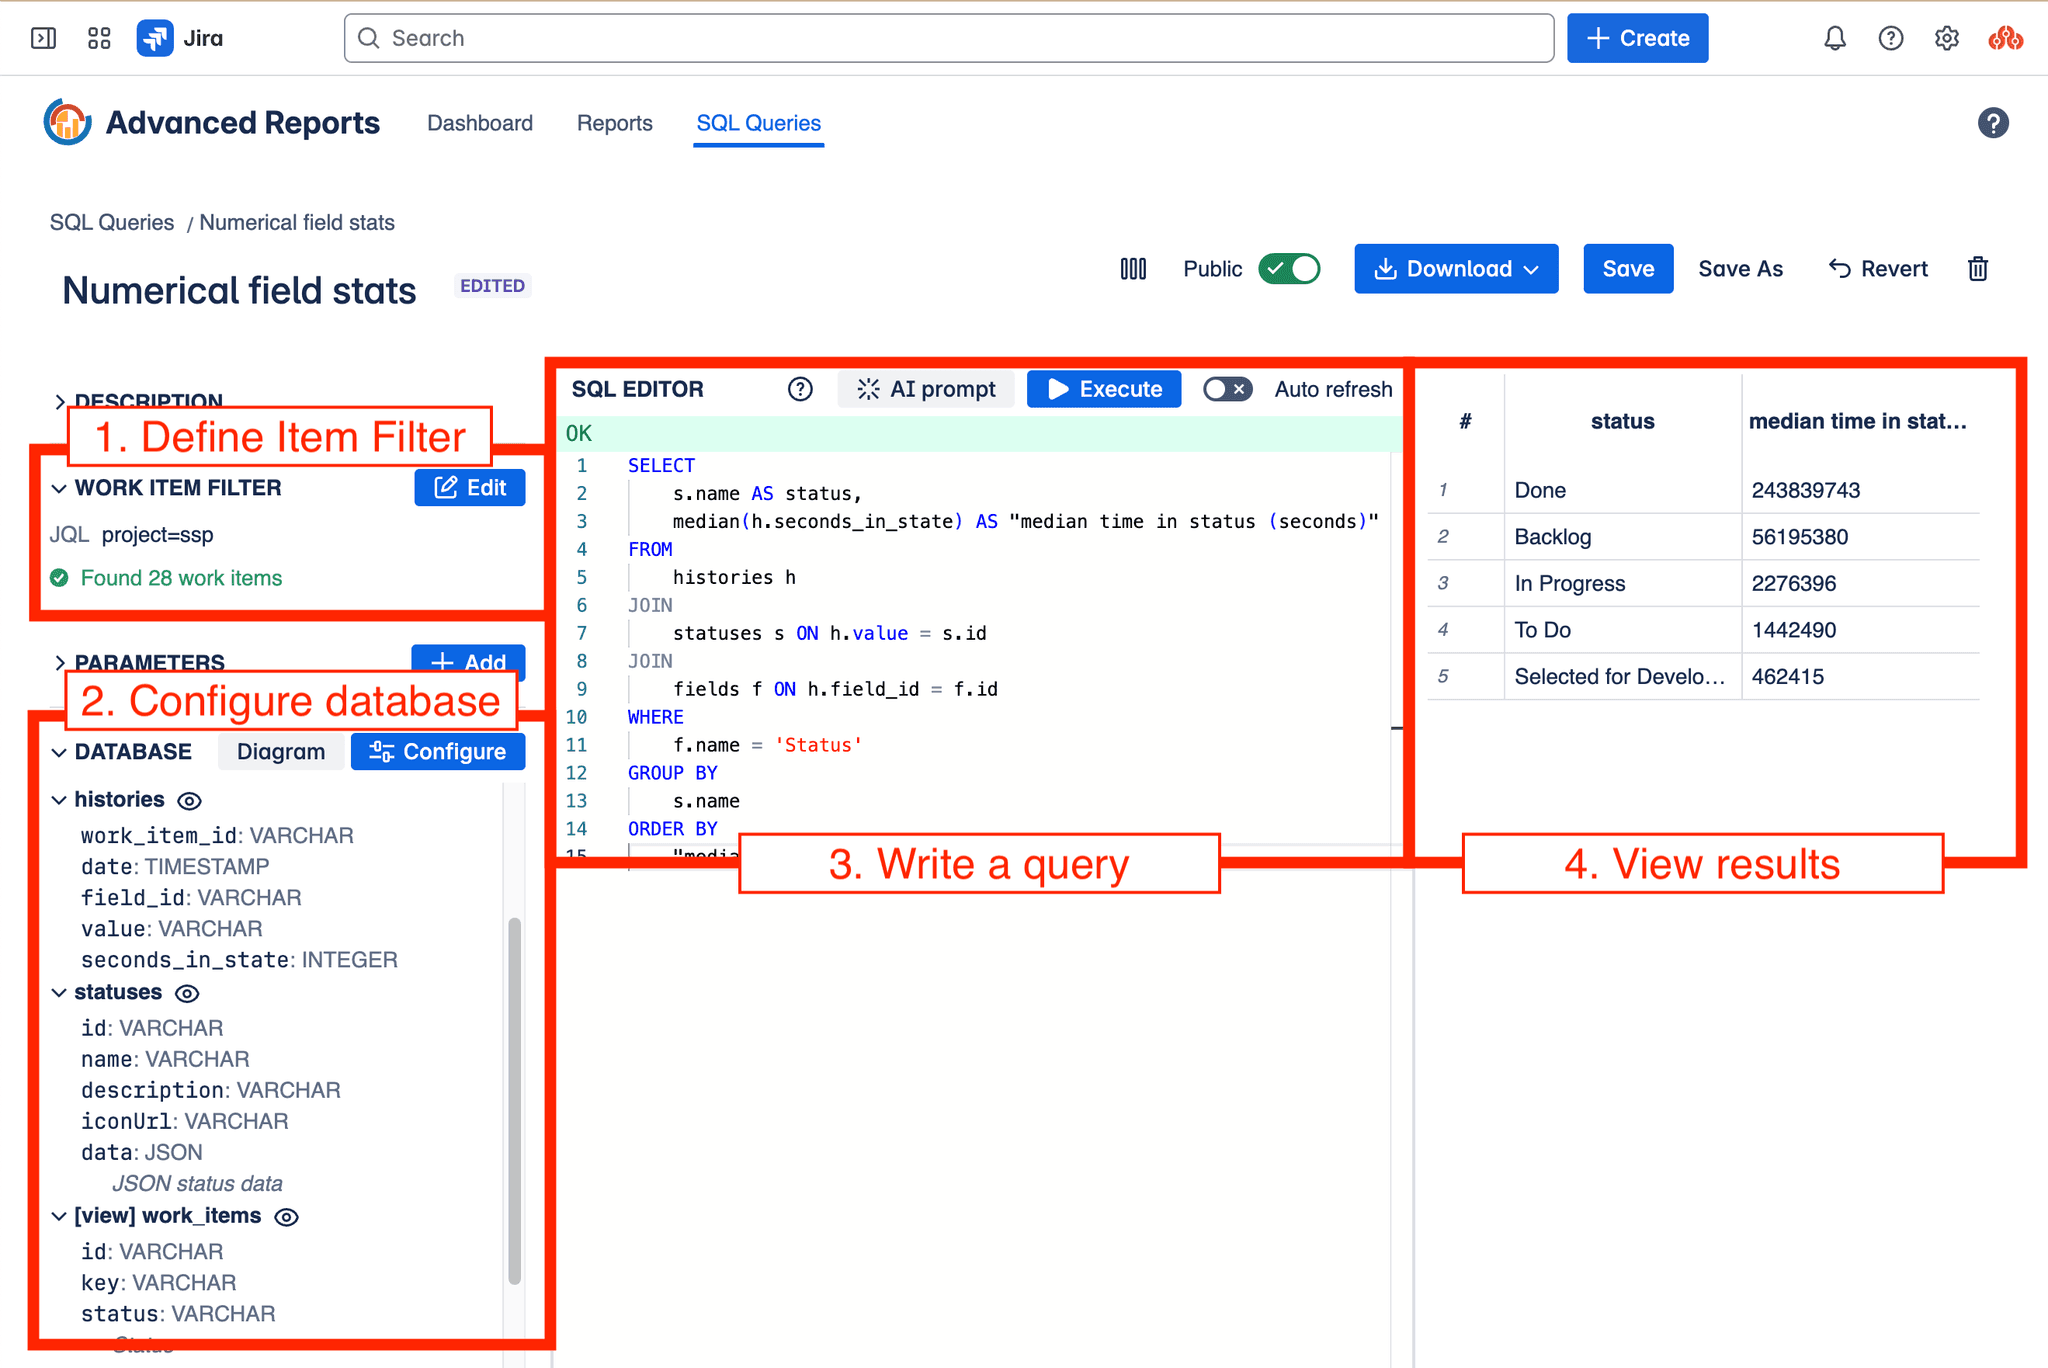
SQL Query Editor - the process
- Data Fetching: The app connects to your Jira instance and fetches work item data based on an Work Item Filter you define. This filter can be a JQL query, a saved Jira filter, or (for Jira Software projects) an Agile board or sprint.
- Local Database Creation: Using the fetched data, the app constructs a relational database directly within your web browser using DuckDB (opens in a new tab). All your Jira data remains local to your browser session; no data is stored on a server. Configure which fields to include in the database using the Configure modal.
- SQL Querying: Once the in-browser database is ready, you can query it using standard SQL. This unlocks powerful and complex analytical capabilities not easily achievable with JQL alone or without exporting data and setting up your own database infrastructure.
You can write SQL queries manually in the editor, leverage pre-built templates, or use the AI Prompt feature to help generate queries. Unlike many reporting tools that process data server-side, queries here run directly against the local database.
- View and export results in various formats (CSV, Parquet) for further analysis or reporting.
Performance: Executing SQL queries against the local database is typically very fast. However, the initial step of fetching data from Jira and building the database can take several seconds, depending on the number of work items retrieved by your Work Item Filter.
Parameterization: For dynamic reports, you can parameterize your SQL queries. For example, instead of hardcoding specific status names, you could use a parameter like $status_category which can be set when the report runs, allowing the same query to analyze 'To Do', 'In Progress', or 'Done' work items. See the Parameters section for more details.
SQL Editor
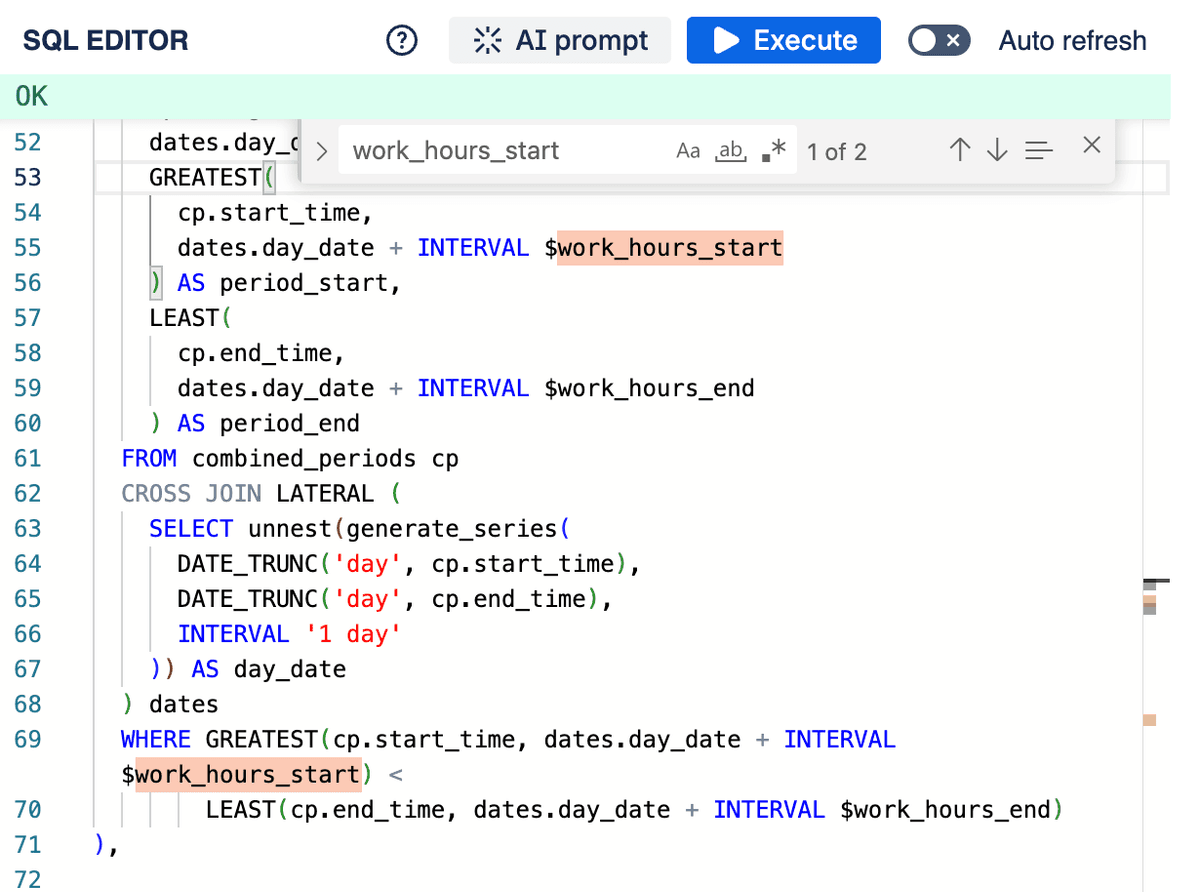
The SQL editor provides a dedicated space for writing and testing your SQL queries. Key features include:
- Syntax Highlighting: Makes your SQL code easier to read and understand by color-coding keywords, functions, and other elements.
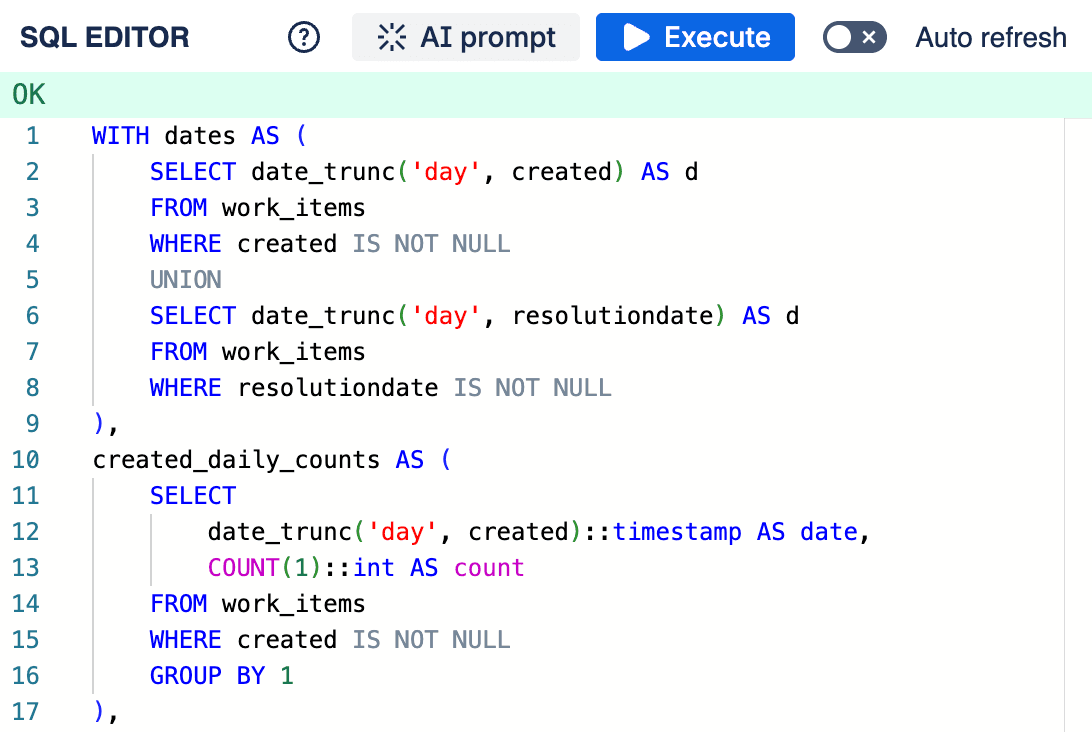
SQL Query Editor
- Error Display: Highlights syntax errors and displays execution errors returned by the database after running a query.
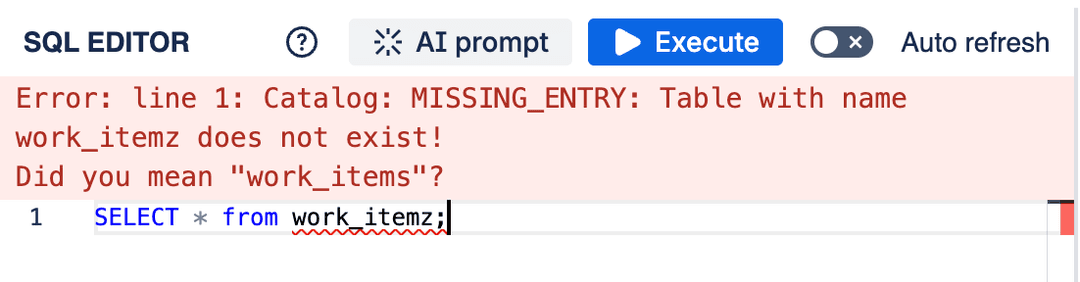
SQL error
- Execution Options:
- Click the Execute button.
- Enable the Auto Refresh toggle to automatically run the query after any modification.
- Use the keyboard shortcut:
Cmd + Enter(macOS) orCtrl + Enter(Windows/Linux).
Queries must adhere to the DuckDB SQL dialect. Refer to the DuckDB SQL Introduction (opens in a new tab) for detailed documentation on the syntax and available functions.
The editor also supports query parameterization. See the Parameters section for details on how to use them.
Parameters
You can define parameters within your SQL queries to make them dynamic and reusable, especially when incorporating them into reports. Parameters are denoted using a dollar sign followed by the parameter name, like $parameter_name.
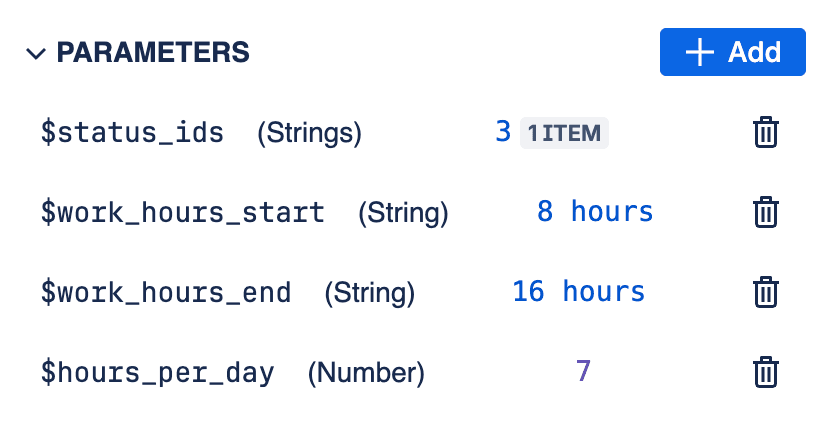
SQL Query Parameters
SQL Query Parameters used in editor
Supported parameter types include:
stringnumberbooleandatetimestamp
Each of these types can also be used as an array. Arrays are bound to the query either as Struct or Array(List) type in the query. The type depends on the parameter name suffix:
- If the parameter name ends with
_arrayor_list, it is treated as an array (list). - If the parameter name does not have these suffixes, it is treated as a struct (row type).
In DuckDB:
- (x1, x2, x3) is a struct (also called a row type or record type)
- [x1, x2, x3] is an array (also called a list)
Struct is a type expected e.g. by IN operator, while array is a type expected by ANY, UNNEST operator.
Any array parameter with the name ending with _array or _list is treated as a DuckDB ARRAY parameter. For example, array of strings $status_category_array would become ARRAY['v1', 'v2'], while $status_categories would be ('v1, 'v2').
Parameters function similarly to named variables in prepared statement parameters (opens in a new tab) in standard SQL systems. When the query is executed (either directly or within a report), you provide values for these parameters, which are then safely substituted into the query before execution.
Parameterized queries are particularly useful for reports. You can reuse the same query structure multiple times within a single report, simply by providing different parameter values for each instance. For example, you could have a single query designed to calculate the median time work items spend in a particular status category. By using parameters for the status category ($status_category) and work item type ($work_item_type), you could run this query multiple times in one report to show the median time for 'Bugs' in 'In Progress', 'Tasks' in 'In Progress', 'Bugs' in 'Done', etc., without needing to write separate queries for each combination.
Database configuration
The in-browser database is generated based on the data fetched from your Jira work items. For efficiency, the application doesn't fetch every single piece of data for every work item by default. Instead, it retrieves only the fields necessary for your analysis.
For example, if you want to calculate the time an work item spent in various statuses, the application needs to fetch the "Status" field and the work item's historical data (changelog).
You can control which fields are fetched using the Configure modal.
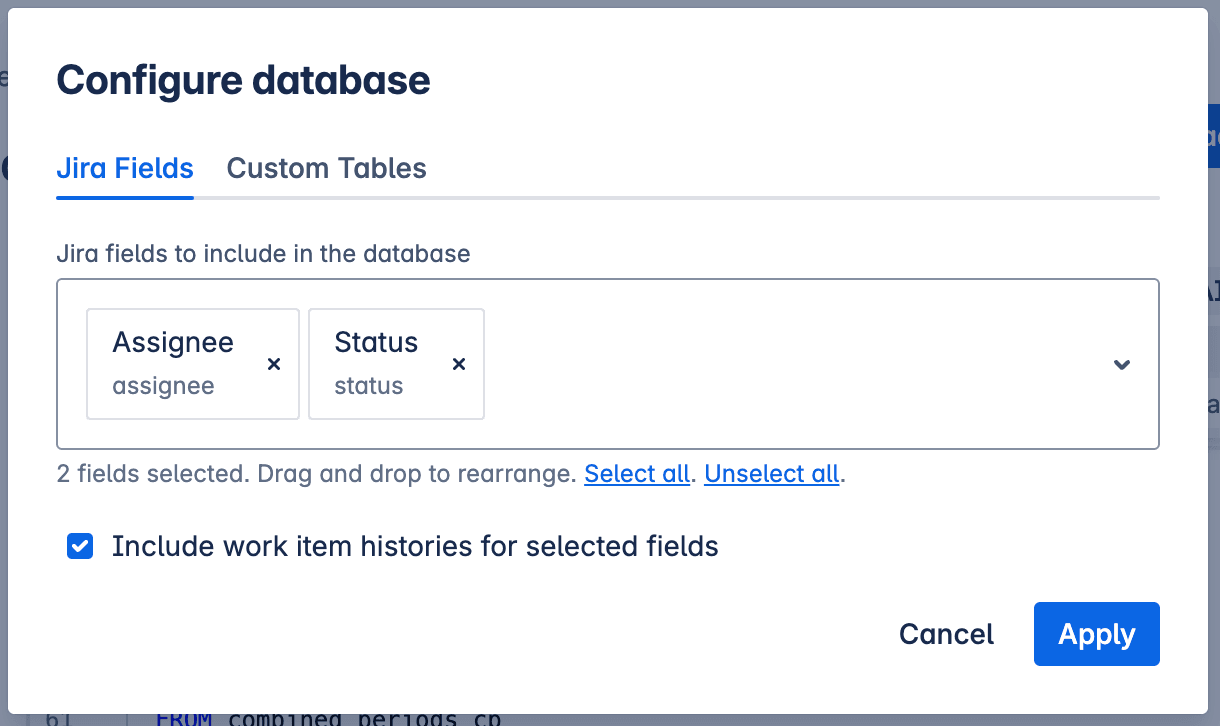
Database configuration modal
In this modal, you can:
- Select the specific Jira fields required for your queries. (Note: While many common fields are supported, some may not be available yet. You can request support for additional fields.)
- Choose whether to include historical data (work item changelog), which is essential for time-based analysis like cycle time or time-in-status calculations.
When historical data (changelog) is included, it might contain references to Jira entities (like statuses, work item types, projects, or versions) that are no longer present in the work items currently fetched by your filter (e.g., an old status that is no longer in use). In such cases, the application automatically fetches details about these historical entities using dedicated Jira APIs to ensure the database contains comprehensive information for accurate analysis.
Once the fields are changed, the application may need to re-fetch the work items and rebuild the database.
Configuring the database correctly ensures that you have the necessary data for your SQL queries while optimizing the initial data fetching time.
Database Schema
The application generates a relational database schema based on the fetched Jira data and the configured fields. Here's an example structure:
CREATE TABLE fields(
    id VARCHAR UNIQUE,
    "key" VARCHAR,
    "name" VARCHAR,
    custom BOOLEAN,
    "schema" JSON
);

CREATE TABLE histories(
    work_item_id VARCHAR,
    date TIMESTAMP,
    field_id VARCHAR,
    "value" VARCHAR,
    seconds_in_state INTEGER,
    UNIQUE(work_item_id, date, field_id)
);

CREATE VIEW work_items AS
    SELECT id, "key", status, assignee, issuetype
    FROM __internal_work_items_all WHERE ((__internal_work_item_sources & 2) > 0);

--
-- Tables based on Jira fields select in database configuration
--
CREATE TABLE issuetypes(id VARCHAR UNIQUE, "data" JSON);

CREATE TABLE statuses(
    id VARCHAR UNIQUE,
    "name" VARCHAR,
    description VARCHAR,
    iconUrl VARCHAR,
    "data" JSON
);

CREATE TABLE users(id VARCHAR UNIQUE, "data" JSON);

--
-- View showing human readable values (e.g. names instead of IDs)
--
CREATE VIEW work_items_display AS
    SELECT __internal_work_items_all.id AS id
        __internal_work_items_all."key" AS "key",
        json_extract_string(statuses."data", 'name') AS status,
        json_extract_string(users_assignee."data", 'displayName') AS assignee,
        json_extract_string(issuetypes."data", 'name') AS issuetype
    FROM __internal_work_items_all
    LEFT JOIN statuses
        ON ((statuses.id = __internal_work_items_all.status))
    LEFT JOIN users AS users_assignee
        ON ((users_assignee.id = __internal_work_items_all.assignee))
    LEFT JOIN issuetypes
        ON ((issuetypes.id = __internal_work_items_all.issuetype))
    WHERE ((__internal_work_items_all.__internal_work_item_sources & 2) > 0);
The database schema is displayed next to the SQL Editor:
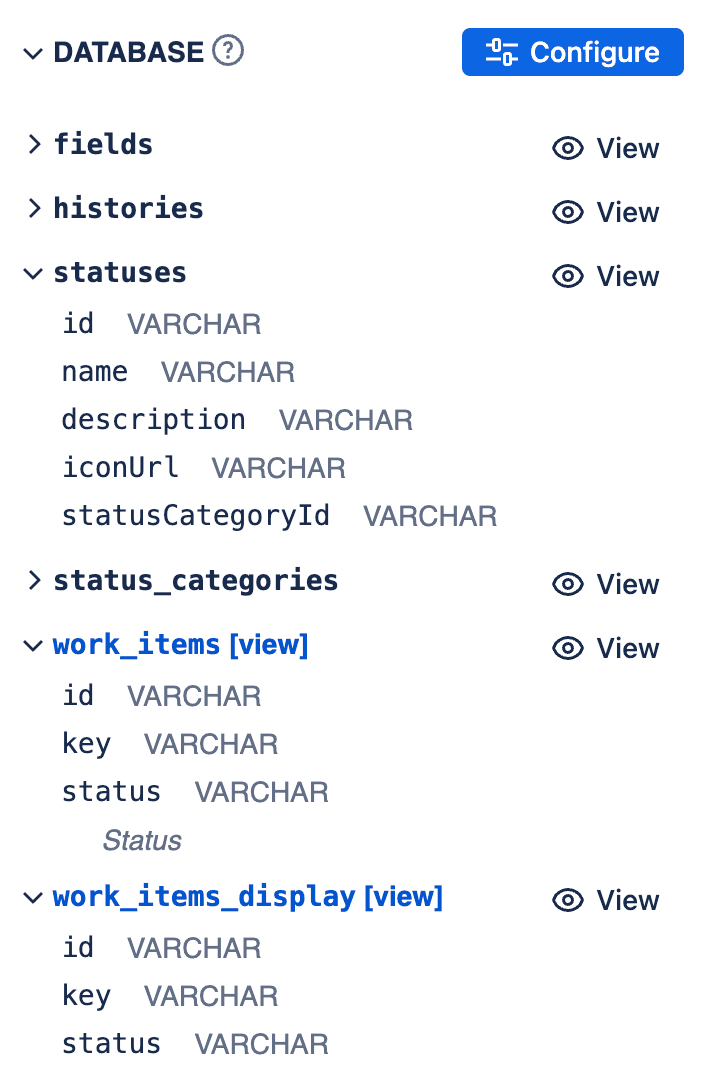
Database Schema
Key Tables and Views:
-
work_items(View): This view represents your Jira work items. Each column corresponds to a Jira field you selected in the configuration. Column names are the Jira field IDs (e.g.,status,assignee,issuetype,customfield_10010). These columns might contain simple values or foreign keys referencing other tables. -
work_items_display(View): This is a convenience view built on top of the underlying work items table (__internal_work_items_all). It automatically joins common fields like status, assignee, and issuetype with their respective lookup tables (statuses,users,issuetypes) to display human-readable names instead of raw IDs. -
fields(Table): Contains metadata about all available Jira fields, including their ID (id), key (key), name (name), whether they are custom (custom), and their schema definition (schema). The id from this table corresponds to the column names in the work items view. -
histories(Table): Stores the historical changes for work item fields (if historical data is configured). Each row represents a specific value a field held for an work item over a period.work_item_id: The ID of the work item.date: The timestamp when the field changed to this value.field_id: The ID of the field that changed.value: The ID or value the field changed to.seconds_in_state: The duration (in seconds) that the work item spent with the field value specified in the same row. This is crucial for calculating time-in-status or cycle time metrics.
-
Lookup Tables (
issuetypes,statuses,users, etc.): These tables store details about specific Jira entities referenced by ID in the work items or histories tables. They typically contain an id column and a data column (often JSON) holding detailed information about the entity (e.g., name, description).
Understanding this schema is key to writing effective SQL queries against your Jira data.
Custom tables
Sometimes, you might need data that isn't available directly within Jira for your analysis. This could include information like national holidays, specific team allocations, or other project-specific metadata. Custom tables allow you to incorporate this external data into your in-browser database.
You can add custom tables via the Configure modal, under the Custom Tables tab.
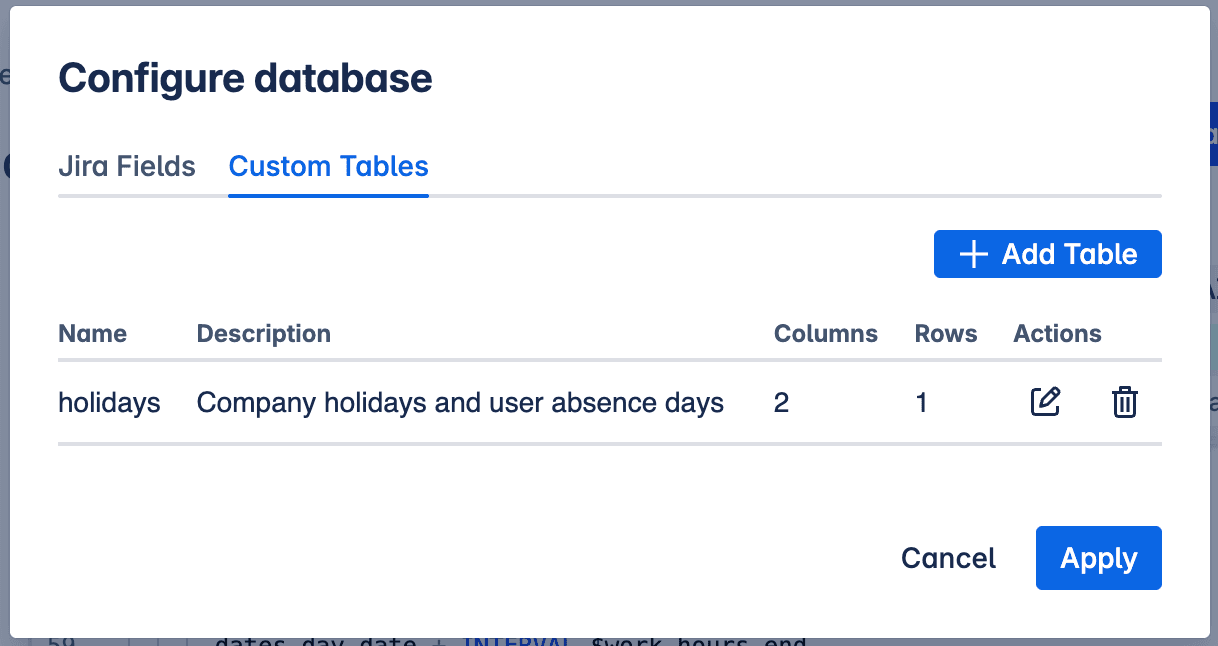
Custom tables in Configure database modal
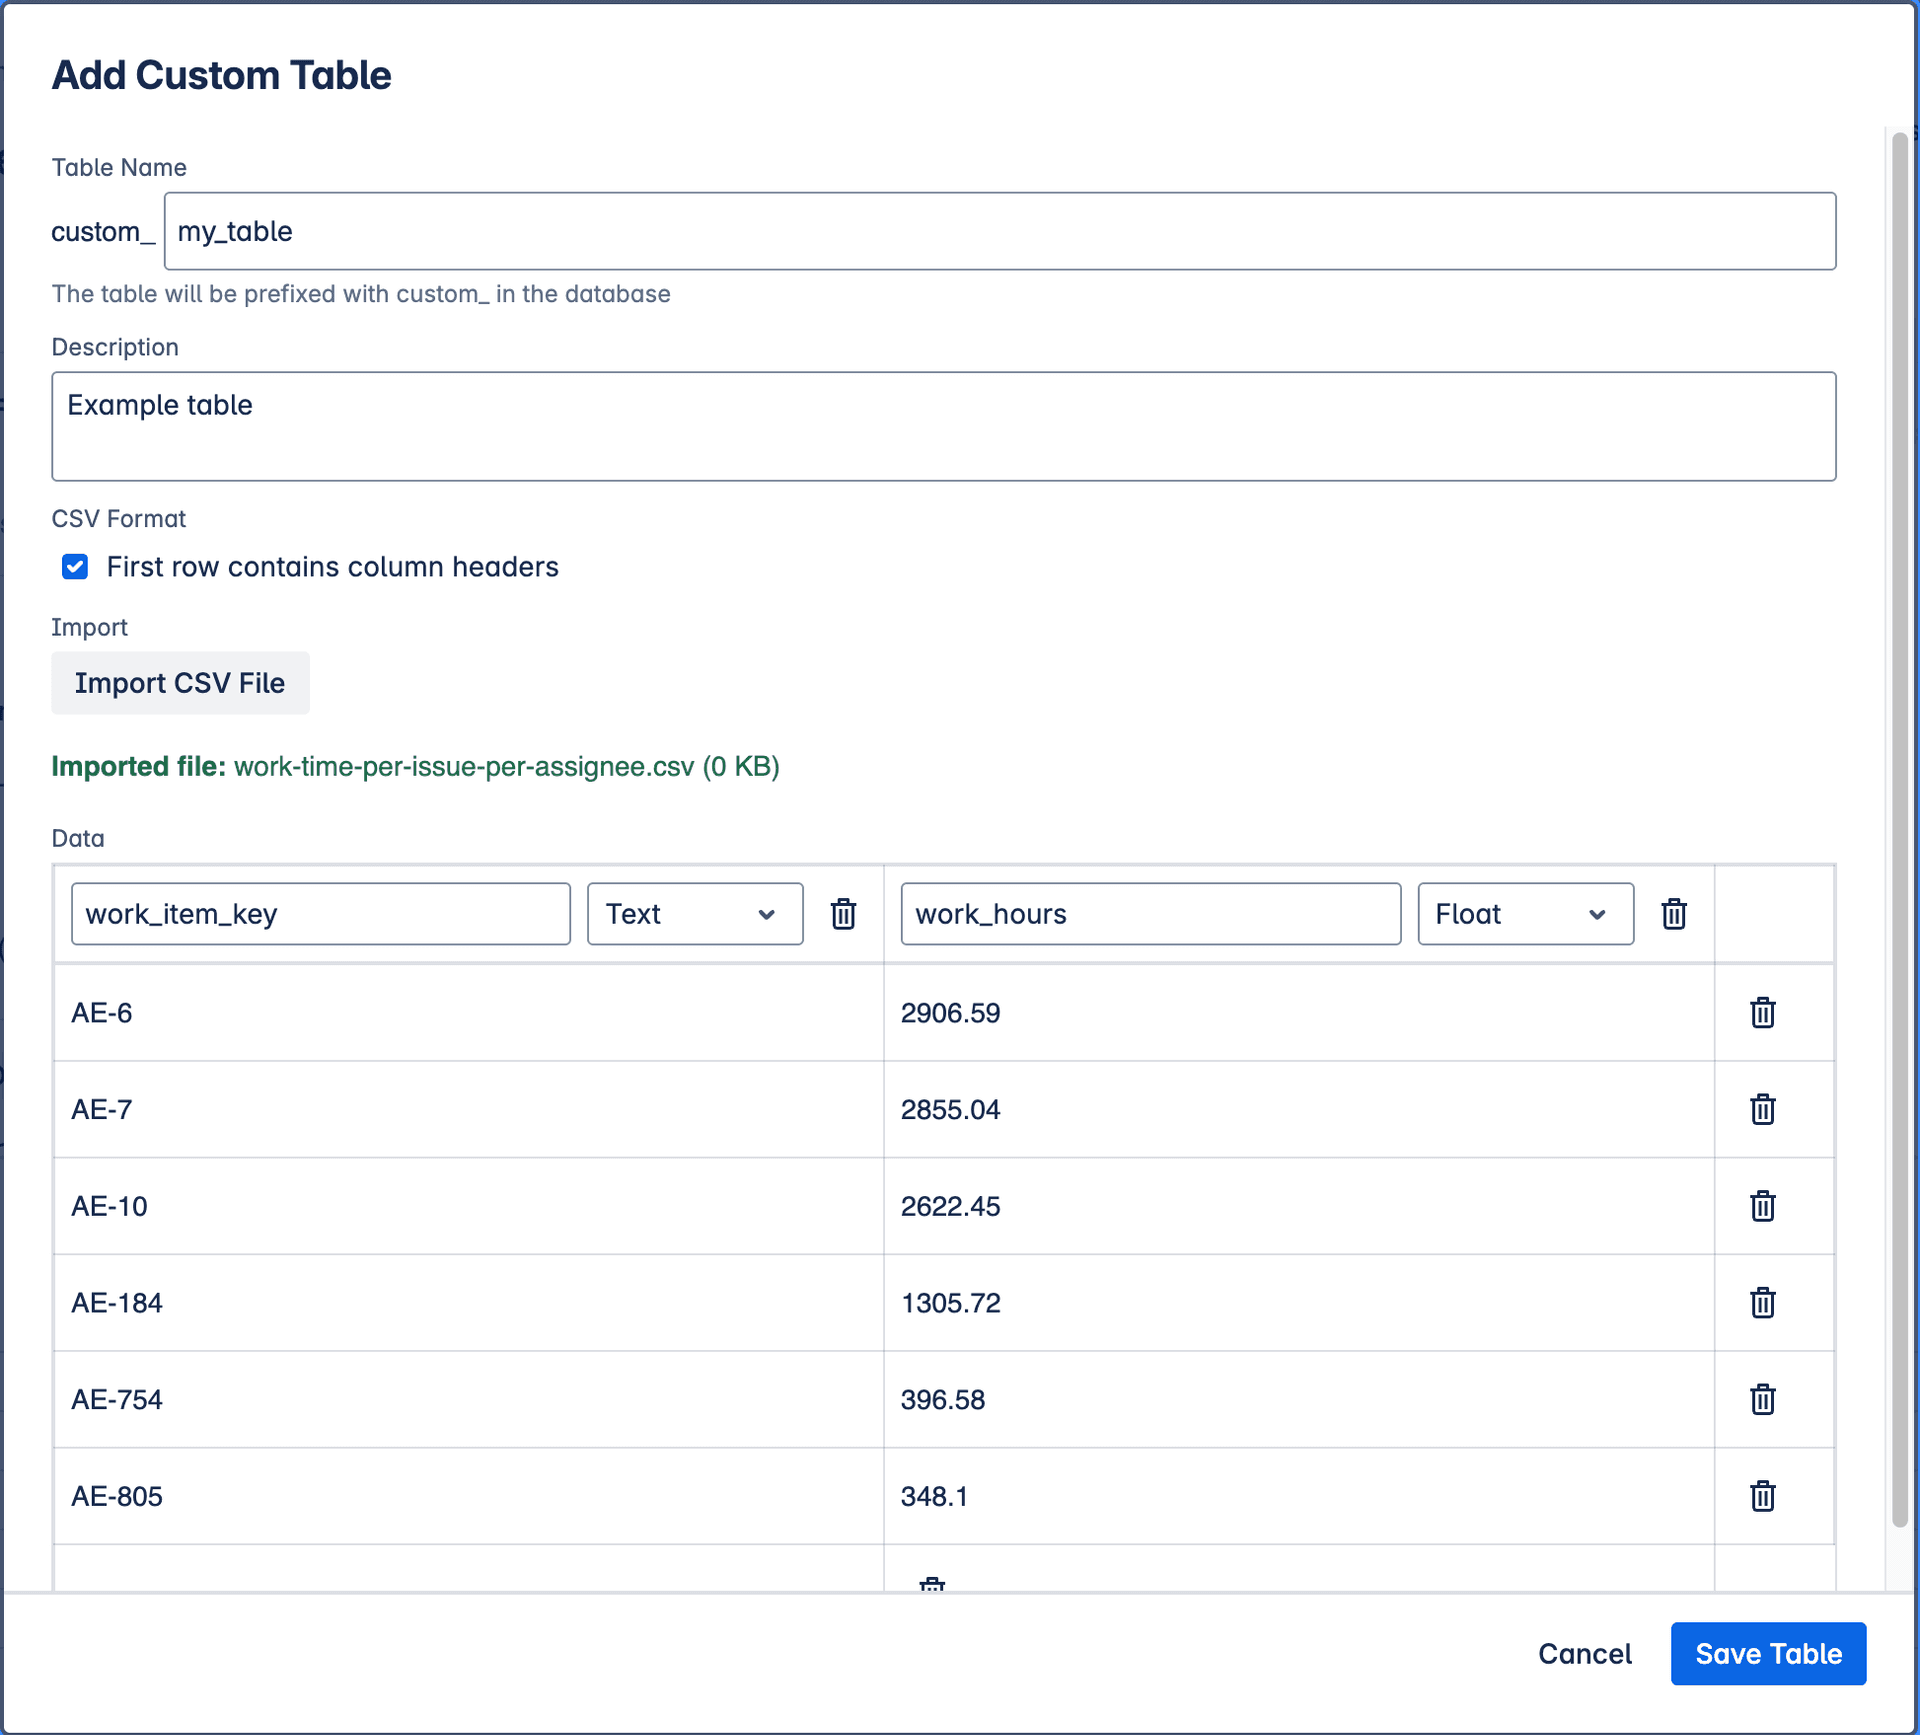
Add custom table
The process involves:
- Uploading a CSV file: Provide your custom data in a standard Comma Separated Values (CSV) format.
- Defining Column Types: Specify the data type (e.g., string, number, date) for each column in your uploaded CSV to ensure it's correctly interpreted by the database.
Once defined, the data from your custom table is saved alongside your query configuration. When the database is built, this custom data is loaded into its own table, allowing you to join it with your Jira data in SQL queries.
Writing queries
While the application provides a fully functional DuckDB instance running directly in your browser, allowing for complex data manipulation, it's generally recommended to primarily use SELECT statements for querying your Jira data.
Modifying the database schema (e.g., using CREATE TABLE, ALTER TABLE, or DROP TABLE) within your queries can lead to unpredictable results, especially when the query is executed as part of a report alongside other queries. Such modifications might interfere with the expected database state for subsequent queries or report components.
Additionally, you can leverage the AI Prompt feature to help generate, improve, or fix your SQL queries. See the SQL Query Examples page for practical examples.
For detailed information on the SQL syntax and functions supported by DuckDB, refer to the official DuckDB SQL Introduction (opens in a new tab).
Exporting data
After running your SQL query, you can export the results for further analysis or use in other tools. The results can be downloaded in two common formats:
-
CSV (Comma Separated Values): A simple text-based format where data is organized in rows, with values separated by commas. CSV files are highly compatible and can be easily opened and manipulated in spreadsheet software like Microsoft Excel, Google Sheets, or Apple Numbers. They are ideal for sharing smaller datasets or for quick viewing and basic analysis.
-
Parquet: A highly efficient, columnar storage format optimized for big data processing frameworks. Parquet files store data column by column, which leads to better compression and faster query performance, especially when dealing with large datasets and selecting specific columns. This format is well-suited for data warehousing, data lakes, and analysis using tools like Apache Spark, Pandas (in Python), or other data science platforms.
Choose the format that best suits your needs based on the size of your data and how you intend to use it downstream.
Charts
You can create visualizations based on the results of your SQL queries. Charts can be created directly in the SQL Query editor. To do this, click on the "Charts" button in the Results section of the SQL Query editor. This will allow you to manage existing charts or create new ones based on your query results.
You can store multiple charts for each SQL query, allowing you to visualize different aspects of the data without needing to write separate queries for each chart.
Once saved with the query, you can then easily embed charts into reports.
See Charts for more information on how to create and manage charts based on SQL query results.

SQL Query Editor - Charts
AI Query Generator
The built-in AI Query Generator can help writing queries, fixing errors, or improving existing SQL code.

AI Query Generator in SQL Query Editor
The AI model has following information about the database:
- Database Schema: The structure of your database tables and columns.
- Current SQL Query: Existing SQL query in the editor you want to refine or use as a starting point.
- Your Request: A natural language description of what you want the SQL query to achieve (e.g., "Show me all users created in the last month").
Some queries may prompt the AI to suggest adding additional Jira fields to the database. When this happens, you can use the "Add missing fields" button or open the Database Configure modal to include the suggested fields. The AI will then regenerate the SQL query based on the updated database schema.

AI Query Generator suggesting adding missing fields
AI Query Generator can be used to:
- Create new queries from scratch: Describe what you want to analyze (e.g., "Show me the average cycle time by work item type for the last quarter")
- Fix syntax errors: Ask the AI to identify and correct issues
- Optimize existing queries: Improve performance or readability of your current SQL code
- Add new functionality: Extend existing queries with additional calculations or filters
- Learn SQL syntax: Get examples of how to implement specific operations in DuckDB SQL
- Generate complex joins: Create queries that combine data from multiple tables (work items, histories, custom tables)
- Build time-based analysis: Create queries for cycle time, time-in-status, or historical trend analysis
The AI Query Generator is a powerful tool, but it has limitations:
- The AI does not have access to the actual data in your database, so it cannot provide specific results or insights based on the data itself. Instead, it generates SQL code based on the schema and your request.
- The generated SQL may require manual adjustments to fit your specific needs or to correct any inaccuracies.